
php8 에 도입되는 annotation (attributes)
php 8 부터는 attrubutes 라는 기능을 사용할 수 있습니다. 다른 많은 언어에서는 annontation 이라고 불리는 것이죠.
👀 123
파일 업로드 구현이야 많이들 해보셨겠지만 용량이 커진다면? 생각보다 신경쓸게 많아집니다.

분할 업로드를 구현했을 때 얻을 수 있는 이점들은 생각보다 꽤 많습니다. 가령…
오늘은 axios 라이브러리를 활용하여
resumablejs 라이브러리 메뉴얼을 참고하여 분할 업로드 기능을 구현해보도록 하겠습니다.
원리는 정말 간단합니다. 파일을 그냥 짤라서 서버에 던지고, 서버에서는 파일을 합치면 됩니다.

물론 말은 쉽겠지만 코드로 이야기 하겠습니다.
먼저 이 글의 중점은 프론트엔드이므로, 기존 라이브러리를 활용하도록 하겠습니다. 빠른 진행을 위해서 laravel 을 선택 했습니다.
composer create-project --prefer-dist laravel/laravel이 라이브러리가 쓸만한거 같더군요.
composer require pion/laravel-chunk-upload이제 업로드를 처리할 Controller 를 정의합니다. 업로드 진행시 퍼센트를 리턴해주며, 완료시에는 파일 병합 및 이동을 담당하게 됩니다.
class UploadController extends Controller
{
    //
    public function request(Request $request, FileReceiver $receiver)
    {
        if ($receiver->isUploaded() === false) {
            throw new UploadMissingFileException();
        }

        // receive the file
        $save = $receiver->receive();

        // check if the upload has finished (in chunk mode it will send smaller files)
        if ($save->isFinished()) {
            // save the file and return any response you need
            return $this->saveFile($save->getFile());
        }

        $handler = $save->handler();

        return response()->json([
            "done" => $handler->getPercentageDone(),
            "status" => true
        ]);
    }

    /**
     * Saves the file
     *
     * @param UploadedFile $file
     *
     * @return \Illuminate\Http\JsonResponse
     */
    protected function saveFile(UploadedFile $file)
    {
        $fileName = $this->createFilename($file);

        // Group files by the date
        $yearFolder = date('Y');
        $monthFolder = date('m');
        $filePath = "upload/{$yearFolder}/{$monthFolder}/";
        $finalPath = storage_path("app/public/{$filePath}");

        // move the file name
        $file->move($finalPath, $fileName);

        return [
            'path' => Storage::url($filePath . $fileName)
        ];
    }

    /**
     * Create unique filename for uploaded file
     * @param UploadedFile $file
     * @return string
     */
    protected function createFilename(UploadedFile $file)
    {
        return implode([
            time(),
            mt_rand(100, 999),
            '.',
            $file->getClientOriginalExtension()
        ]);
    }
}라라벨이 기본셋으로 vue 를 지원하여 선택하였습니다. (물론 react 도 지원합니다.)
별다른 설정 없이도 hot reload + webpack 을 지원하여 대!단!히! 편합니다.

input 태그를 담는 vue component 를 만들어 봅시다.
<input
    type="file"
    class="custom-file-input"
    accept="video/*,audio/*,image/*"
    ref="fileContainer"
    @change="onChangeFile"
/>
파일을 첨부하면, data 에 자동으로 등록되게끔 했습니다.
	onChangeFile() {
		const file = this.$refs.fileContainer.files;
		this.file = file.length > 0 ? file[0] : null;
	}
onsubmit 이벤트 시점에 axios 로 POST 호출하도록 설정하겠습니다.
const api = axios.create({
    headers: {
        'Content-type': 'application/x-www-form-urlencoded',
        Accept: 'application/json',
    },
});

const chunkSize = 1024 * 1024;
axios 개체를 만들어주고, 한번에 1Mb 씩 업로드하도록 사이즈를 지정했습니다.
const start = options.chunkNumber * chunkSize;
const end = Math.min(file.size, start + chunkSize);

let currentChunkSize = chunkSize;
if (options.chunkNumber + 1 === options.blockCount) {
    currentChunkSize = file.size - start;
}

const params = new FormData();
params.append('resumableChunkNumber', options.chunkNumber + 1);
params.append('resumableChunkSize', currentChunkSize);
params.append('resumableCurrentChunkSize', currentChunkSize);
params.append('resumableTotalSize', file.size);
params.append('resumableType', file.type);
params.append('resumableIdentifier', options.identifier);
params.append('resumableFilename', file.name);
params.append('resumableRelativePath', file.name);
params.append('resumableTotalChunks', options.blockCount);
params.append('file', file.slice(start, end), file.name);
resumablejs 라이브러리 메뉴얼을 참고하여 FormData 객체를 만들어줍니다.
여기에서 참고할 내용은 chunk 순서에 따라서 파일을 짜르는 것과 FormData 객체에 append 시에 세번째 파라미터를 추가하는 것입니다. 자세한 내용은 Blob 과 FormData 레퍼런스를 참조하세요.
return api
  .post(endpoint, params)
  .then((res) => {
    options.onProgress && options.onProgress(parseInt((end / file.size) * 100, 10), res);
    if (end === file.size) {
      options.onSuccess && options.onSuccess(res);
    } else {
      options.chunkNumber++;
      return chunkUploader(endpoint, file, options);
    }
  })
  .catch((err) => {
    options.onError && options.onError(err);
  });
그런 다음 callback event 들을 정의해주기 위한 처리를 합니다. 최초 실행한 이후에 onProgress callback 으로는 현재 진행상태를 공유하고 업로드 완료되면 onSuccess callback 을 실행하게 됩니다.
export default {
    chunk: (endpoint, file, onProgress, onError, onSuccess) => {
        const blockCount = Math.ceil(file.size / chunkSize);
        const chunkNumber = 0;
        const identifier = `${file.size}-${file.name.replace('.', '')}`;

        return chunkUploader(endpoint, file, {
            blockCount,
            identifier,
            chunkNumber,
            onProgress,
            onError,
            onSuccess,
        });
    },
};
최초 업로드 요청을 처리하기 위한 함수를 정의합니다. identifier 는 병합할 대상을 구분하기 위한 유니크한 ID 입니다.
onSubmit() {
    if (null === this.file) {
        alert('파일을 선택하여 주세요.');
    } else {
        this.progress = 0;
        this.result = null;

        uploadService.chunk(
            '/api/upload',
            this.file,
            // onProgress
            percent => {
                this.progress = percent;
            },
            // onError
            err => {
                alert('에러가 발생하였습니다!');
                console.log(err);
            },
            // onSuccess
            res => {
                const { data } = res;
                this.result = data.path;
            }
        );
    }
}
다시 onsubmit 이벤트 처리에서 아까 전에 정의한 메쏘드를 호출 합시다. (추가로 각 callback event 들을 연결시켜 줍니다.)
이렇게 파일 업로드 매니저가 뿅하고 탄생했습니다. bootstrap 를 이용해서 예쁘게 꾸며줍시다. 프로그레스바까지 꾸며주었습니다.
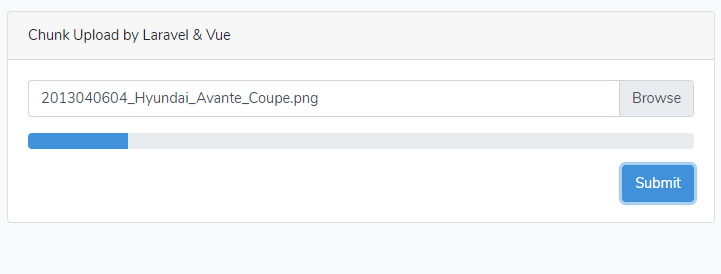
예제에 사용된 모든 소스 코드는 여기 에서 볼 수 있습니다. (axios는 너무나 좋은 툴입니다. 모두 쓰세오…)
php 8 부터는 attrubutes 라는 기능을 사용할 수 있습니다. 다른 많은 언어에서는 annontation 이라고 불리는 것이죠.


Apex Seoul에 스캔라인과 둥근 브라운관 외곽, 색 번짐과 테이프 떨림을 더했다. 단순한 일렁임에서 CRT 형태를 잡고, PLAY와 시간 표시까지 셰이더 안에 넣은 과정을 정리했다.

가상 버튼을 기본으로, 기울기 조향은 선택으로. Apex Seoul의 모바일 입력과 권한 처리, 화면 회전 시 일시정지, 설치형 PWA까지 앞으로 구현할 방향을 정리했다.

세 차량의 코너링 설정을 프로파일로 분리했다. 터보 차량의 변속과 RPM 컷을 수정하고, Retry 뒤 나무가 사라지던 Scene 수명주기 버그를 정리했다.

코너 충돌 뒤 가속해도 움직이지 못하는 상황에 자동 복귀를 붙였다. 정상 정차와 고착을 구분하는 조건, 도로 중앙 배치와 차량 상태 초기화, 깜박임 연출, 타임어택 기록을 지키는 처리까지 정리했다.